Linksys RE6350 Wi-Fi Extender Quick Setup Guide
Configuring your Linksys RE6350 enhances Wi-Fi coverage in places where the signal is weak or sluggish. If the steps are correctly followed, the setup procedure is quick and simple. You’ll need your Wi-Fi network name and password to complete the installation, so be sure to have them ready before you start.
- The Linksys RE6350 should be plugged into a power outlet close to your primary router.
- It should be positioned between your router and the spot with poor Wi-Fi.
- Wait for the front LED to turn amber after turning on the extender.
- Look for the extender’s default Wi-Fi network on your computer or phone.
- Typically, it appears as “Linksys RE6350 Setup – XXXX.”
- Join this network.
- Launch any web browser.
- Please enter http://192.168.1.1 or In the bar, type http://extender.linksys.com.
- Observe the setup guidelines displayed on the screen.
- You might have to register for a Linksys Smart Wi-Fi account or log in.
- You can choose which Wi-Fi network you wish to expand.
- Put your Wi-Fi password in here.
- If you’d like, you can also modify the password or extended network name.
- To finish the setup, click Next or Finish.
- Use the updated extended Wi-Fi information to connect your devices.
- Verify whether the signal is stronger in places with poor coverage.
Note: Depending on your model, the steps may vary significantly. Consult the Linksys handbook or support page for the most recent assistance.
WPS setup of Linksys RE6350
The Linksys RE6350 supports Wi-Fi Protected Setup, which is a handy technique to connect the extender to your network without manually inputting the Wi-Fi password. Here’s how to use WPS to configure the Linksys RE6350:
- Place the Linksys RE6350 so that it can be seen by your router.
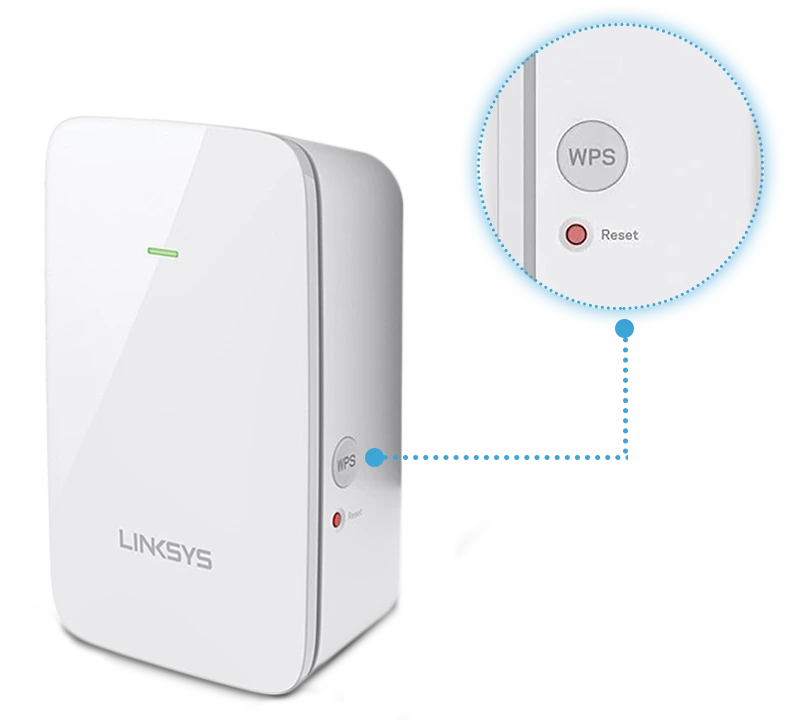
- Press the Extender’s WPS Button.
- Locate the WPS button on the Linksys RE6350. It’s normally on the front panel.
- Turn on WPS for your router.
- There may be different ways to get WPS enabled on your router:
- You can physically press the WPS button on a lot of routers.
- As an alternative, you can establish the connection by logging into the web interface of your router and going to the WPS settings.
- When the Linksys RE6350 successfully establishes a connection with your network, its LED should turn green.
- This shows that the WPS Linksys RE6350 setup was successful.
- To find out if the Linksys extender’s network is accessible, check the Wi-Fi settings on your PC or mobile device.
A Simple Method for Configuring Your Linksys RE6350 Extender manually
Your Linksys RE6350 is easy to set up and takes little time. You can manually set it up by following these simple instructions if you prefer not to utilize the WPS button.
- Position your Linksys RE6350 between the spot with poor Wi-Fi and your router. Verify if the extender is able to pick up the router signal.
- Navigate to the Wi-Fi settings on your tablet, laptop, or phone.
- Find the network name of the extender by default. It will have the appearance of “Linksys RE6350 Setup – XXXX.”
- Join this network.
- You might be prompted to register for a Linksys account or use your current Linksys Smart Wi-Fi login credentials.
- Enter the password for your primary Wi-Fi network after selecting it.
- If you’d like, you can modify the network name and password for the extender.
- To proceed, adhere to the on-screen directions.
- To finish the setup, click Next or Finish.
- Reconnect your devices to the expanded Wi-Fi network after finishing.
- In places with poor signal strength, you should now experience improved Wi-Fi coverage.
Firmware apprises for Linksys RE6350
Your Linksys RE6350 Wi-Fi range extender’s performance, security, and stability depend on firmware updates. The general procedures for updating the RE6350’s firmware are as follows:
- It is advisable to verify the Linksys RE6350’s firmware version before making any updates.
- Open a web browser and type “http://extender.linksys.com” or “http://192.168.1.1” in the address bar.
- Enter your administrator credentials to log in.
- To learn more about the current firmware version, navigate to the firmware information area.
- On the official Linksys support website, navigate to the RE6350 product page.
- Find the firmware section and get the most recent firmware version that works with your device.
- On your PC, save the firmware file.
- Locate the firmware update section on the web-based configuration page for the extender.
- Initiate the firmware update procedure.
- The firmware on the extender will begin to update. It’s imperative that neither the update nor the power supply be interrupted throughout this process.
- After the update is finished, which should take some time, the extender will probably reboot.
- Check the firmware version by logging back into the extender’s web-based setup page once the firmware upgrade is finished.
- It ought should now display the revised version.
Linksys RE6350 Setup Common Issues
- Connection issues
- WPS setup issues
- Persistent technical glitches
- Network issue
- Manual setup issue
- Wifi setup issue
- Issue with settings
- Firmware issue
- Placement issue
- Signal or other device interference
Simple Solutions for a Linksys RE6350 That Isn’t Configuring Correctly
The Linksys RE6350 extender is often easy to set up. However, minor problems can occasionally cause delays. Try these easy solutions to common issues.
- Verify that you are joining the appropriate wireless network. During setup, enter the correct password.
- If automatic setup fails, you can alternatively attempt the manual setup technique.
- Verify whether WPS is supported by your router and adhere to the proper WPS procedures.
- While keeping the extender close to the location where you need stronger Wi-Fi, move it closer to the router.
- Verify that the firmware on your extender has been updated. If necessary, update it.
- Make sure everything is okay by going over your setup settings once again.
- Verify that the password and extended network name (SSID) correspond to the router’s configuration.
- Reset the extender if it doesn’t work. Using a paperclip, press and hold the Reset button for approximately ten seconds.
- To prevent signal crowding, try adjusting the Wi-Fi channel in your router’s settings.
- The extender should be positioned such that it can see the router clearly.
- To prevent signals from being blocked, keep it away from heavy furniture, metal objects, and walls.
You can try setting it up from scratch if you’re still having problems.
FAQs
- How can I begin configuring my Linksys RE6350?
Turn on the extender. Await the arrival of light. Link your laptop or phone to the Wi-Fi extender. Go to the setup page. To connect, follow these instructions.
2. Why won’t my extender connect to my router?
Verify your Wi-Fi password. Verify that you have chosen the appropriate network. Bring the extender closer to the router. Turn both devices back on. Retry the setup.
Can I use the WPS button to set up the RE6350?
If your router is compatible with WPS, then sure. First, press the router’s WPS button. Next, hit WPS on the extender. Await stable light.
3. After setting up, where should I put my extender?
Position the extender midway between the region with a weak signal and the router. Keep it outside. Steer clear of metal objects and strong walls.
4. What is the process for resetting my Linksys RE6350 extender?
Turn on the extender. Press the reset button with a paper clip. Hold for ten seconds or so. Let go and watch for a restart.