Setup Guide for Linksys RE6500
The Linksys RE6500 range extender is simple to set up. To guarantee a good setup, adhere to these specific steps:
. Select the Appropriate Location
- The Linksys RE6500 should be positioned about halfway between your wireless router and the location that needs more robust Wi-Fi coverage.
- Steer clear of anything that might obstruct the signal, such as walls or big metal items.
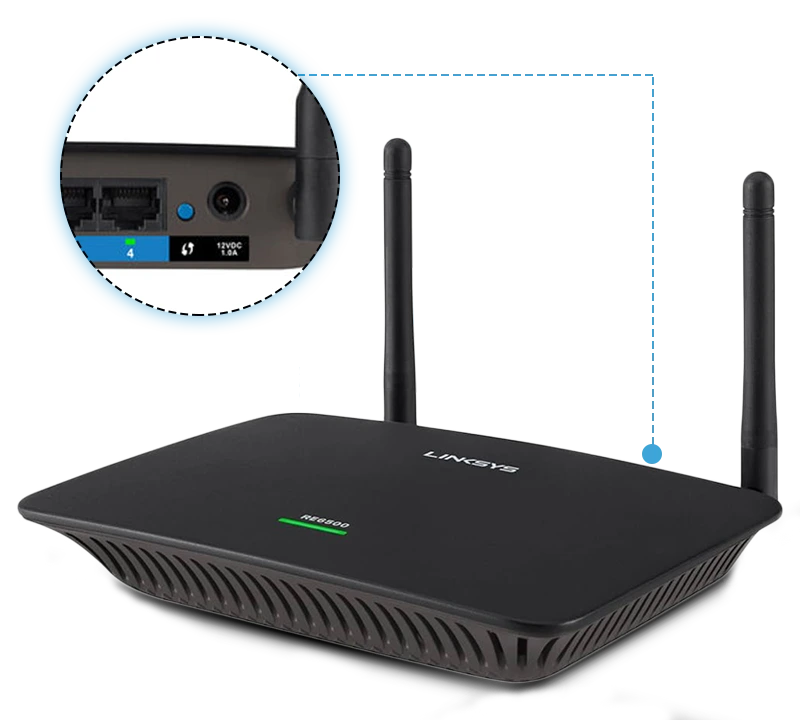
2. Turn the Extender on
- Connect the Linksys RE6500 to a power supply.
- Hold off until the power LED solidifies, signifying that the extender is turned on.
3. Attach the Extender
Look for the preconfigured SSID (network name) of the extension on your device.
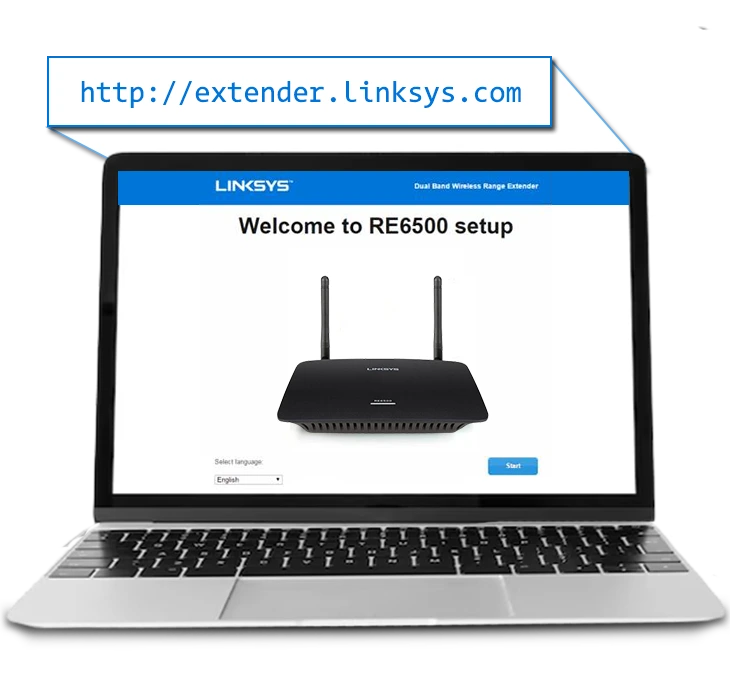
- Launch a web browser and type:
- either http://extender.linksys.com or
- 192.168.1.1 is the default IP address.
The Linksys extender setup page will open as a result.
4. Launch the Configuration
- Observe the directions displayed on the screen.
- To start configuring the expanded network, click Start Setup.
5. Set Up the Extended Network
- Establish the expanded network’s SSID and password.
- Make sure the password and name of the extended network are distinct from those of your primary Wi-Fi network.
- To prevent interference, use a different Wi-Fi channel.
6. Place Extenders Optimally
- The RE6500 should be positioned such that it can both reach the region that requires extended coverage and receive a strong signal from your router for optimal coverage.
7. Check the Status of the Connection
- Verify the connection status by looking at the LED indications on the extender.
8. Firmware Update
- Check for firmware upgrades by going to the Linksys support page.
- If an update is available, install it by following the directions.
9. Personalize Preferences (Optional)
Use the web interface to change parameters like:
- breadth of the channel
- Options for security
- DHCP configuration
- Make any adjustments required to maximize performance.
10. Final Actions
- To guarantee a seamless connection, restart your router, extender, and any linked devices.
Note: Your Linksys RE6500 will offer increased Wi-Fi coverage in the specified region when setup is finished.
Setup Linksys extender RE6500 with WPS setup
Wi-Fi Protected Setup (WPS) is a quick and easy way to set up the Linksys RE6500. With WPS, you may link your range extender to your router without having to manually input your Wi-Fi password. To configure the Linksys RE6500 Setup using WPS, follow these steps:
- When the power LED on the Linksys RE6500 solidifies, plug it into a power outlet.
- Find the Linksys RE6500’s WPS button.
- Usually, the extender’s front panel is where you may find it.
- Click the WPS icon on your wireless network.
- Your router will also feature a WPS button if it is WPS compatible.
- Once WPS has been enabled on the router, press the Linksys RE6500’s WPS button within two minutes.
- When the extender is trying to connect to the router, its WPS LED will begin to blink.
- As soon as the RE6500 and the router successfully establish a connection, the WPS LED on the device will turn solid green.
- Verify that your router and the Linksys RE6500 are now linked.
- Examining the LED indicators on the extension will allow you to achieve this.
- To get the best extended Wi-Fi coverage, position the Linksys RE6500 in the best possible spot.
- Verify the stability and dependability of the connections made by the devices to the expanded network.
- Using a web browser, go to the Linksys RE6500 web interface by typing “http://extender.linksys.com” or the IP address that is set as default, “192.168.1.1.”
- Investigate other options or make changes as necessary.
- To guarantee a smooth and reliable connection, restart your Linksys RE6500, your router, and any other devices that are connected.
Firmware update for linksys RE6500
It’s crucial to update the Linksys RE6500 range extender’s firmware to guarantee top performance, security, and interoperability with the newest features.
- Make that the Linksys RE6500 setup is linked to your PC or mobile device using an Ethernet connection or wirelessly.
- Verify that you have a steady internet connection on your router, extender, and the device you are using to download the update.
- On the device that is linked, open a web browser.
- Either type “http://extender.linksys.com” or the IP address by default, “192.168.1.1,” into the address bar and hit Enter.
- The default username is typically “admin,” and the password is frequently “admin” or left blank if you haven’t changed these. See your user manual for further information on particulars.
- Locate the Firmware Update page. Usually, the Administration or System Tools section has this.
- Make sure you are installing the most recent firmware version by verifying the current version before starting the upgrade.
- Go to the Linksys RE6500 Setup help page by visiting the Linksys support website (linksys.com).
- Find the firmware section and get your extender’s most recent firmware file by downloading it.
- Locate the upload or browse buttons for the firmware file you downloaded in the online interface.
- Several minutes could pass throughout the firmware updating procedure.
- Upon completion of the update, the extender might restart itself.
- If not, restart the Linksys RE6500 by hand to have the modifications take effect.
- To verify that the update was successful, log back into the web interface and look for the updated firmware version.
Note: After a firmware update, it’s advised to do a factory reset on the extender to make sure that any possible compatibility problems are fixed. To prevent incompatibilities and security risks, always utilise the official firmware available on the Linksys website.
Common errors with Linksys RE6500 setup
- Power issues
- Hardware issue
- Wrong details of setup
- Login error
- Wrong password
- Unable to access web login page
- Placement errors
- Firmware update
- WPS failure
- Connection errors
- Multiple connection errors
- LED indicator issues
Troubleshooting Advice for Linksys RE6500
Try the following fixes if you run into problems setting up or using the Linksys RE6500:
1. Verify Connections and Power
- Make sure that the RE6500 is turned on and connected correctly.
- Verify that your primary router can reach it.
2. Check your network credentials
- To prevent connection problems, double-check the password and SSID (network name) during setup.
3. Restart gadgets
- To fix connectivity issues, restart your router, the RE6500 extender, and any connected devices.
4. Firmware Update
- Verify that the most recent firmware is installed on your RE6500.
- Performance may be enhanced and issues can be fixed by updating firmware.
5. Problems with WPS Setup
- If WPS setup doesn’t work, make sure your router has the WPS capability activated before trying again.
6. Issues with Web Interface Login
Try the following if you are unable to access the extender’s online interface:
- Using an alternative web browser
- deleting the cookies and cache from your browser
FAQs
1. How should the Linksys RE6500 be configured?
In order to build an expanded network, plug in the extender, connect to its SSID, open http://extender.linksys.com or 192.168.1.1, complete the on-screen setup process, and verify the LED indications for a correct connection.
2. For optimal coverage, where should I put the RE6500?
Place it halfway between the region that needs greater Wi-Fi and your router. For best results, stay away from any metal, walls, or appliances that might interfere with the signal.
3. Why am I unable to establish a connection with the extender?
Make that the RE6500 has the right SSID and password, is switched on, and is within range. Check WPS settings, restart devices, and, if you’re using the online interface, clean the cache in your browser.
4. How can the Linksys RE6500 firmware be updated?
To install updates and enhance performance, go to the Linksys support website, download the most recent firmware for your model, and then use the web interface to follow the instructions.
5. Can I alter the settings for the extended network?
Indeed, in order to maximize network performance and avoid interference, you may modify the SSID, password, Wi-Fi channel, security settings, and DHCP configurations using the RE6500 web interface.